Wednesday 16 December 2015

Food Gifts Three Ways

Food Gifts Secret Santa Cassie Cakes
Food gifts to giveaway but make sure you keep some for yourself!
My goodness, we just seem to be hurtling towards the big day now aren't we! With less than 10 days to go, you may be well in to your Christmas shopping with hardly anything left to get or maybe you haven't even started! In either case, these three food gifts may be just the thing for gifting to friends and family. And since they are all mail-friendly, they might be just the thing for those a little further away.

Last Christmas, I was scrolling through my Instagram feed and came upon the hashtag '#foodiesecretsanta' - a fantastic food swapped organised by the Brisbane based blogger Claire from Claire K Creations. I signed up at the first chance I got! And I am so glad I did! There is few things more fun in the world than coming home to find a surprise package waiting for you. And it's even more fun when you can eat it! I've received two of my three gifts from my Foodie Secret Santa's, check out my Instagram for the photos. I haven't seen my reciepents get theirs yet but I'm so excited to hear how they like them.

So here are the three foodie gifts that I sent...


Food Gifts Secret Santa Cassie Cakes
Sweet, creamy eggnog fudge.
Fudge with big eggnog flavours! Cinnamon, nutmeg, vanilla and creamy, sweet eggnog. This fudge is easy, made easier with the help of marshmallows to stabilize it. Because of the high proportion of sugar, fudge will withstand being mailed and will keep for two weeks in the fridge.

Eggnog Fudge

Prep time: 10 mins

Cooking time: 15 mins
Total time:  25 mins

Servings: 50 pieces of fudge 

2 cups caster sugar

150ml thickened cream
125g butter, cut in to pieces
¾ cup eggnog
200g white chocolate melts
200g white marshmallows
1 tablespoon spiced rum
1 teaspoon nutmeg - approximately 1/2 a fresh nutmeg
1 teaspoon cinnamon

  1. Line a 30cm x 20cm tin with baking paper
  2. In a large, heavy based pan, place the sugar, cream, butter and eggnog and melt over a medium-high heat until butter is melted and sugar is dissolved.
  3. Use a sugar thermometer, bring the sugar mixture to the soft ball stage - 118°C-120°C/235° F-240° F. This can take some time, stay with it and wait patiently.
  4. Once it has reached soft ball stage, turn the heat down to low.
  5. Add the white chocolate and marshmallows and stir with a wooden spoon. The marshmallows will take some time to melt down.
  6. When the marshmallows have begun to melt, turn heat off.
  7. Add the rum, nutmeg and cinnamon and continue to stir until the marshmallows have completely melted.
  8. Pour mixture in to prepared pan and grate over extra nutmeg and sprinkle with extra cinnamon.
  9. Refrigerate overnight.
  10. Cut fudge into small pieces and wrap with vellum or baking paper.
Food Gifts Secret Santa Cassie Cakes
Homemade Nutella
Who can resist the combination of hazelnuts and chocolate! This is a chocolate lovers dream. You will be on the top of your friends nice list when you give them a jar full of delicious Chocolate Hazelnut spread!

Chocolate Hazelnut Spread - Homemade Nutella
Prep time: 10 mins
Cooking time: 10 mins
Total time:  20 mins

Servings: 2 cups

250g whole hazelnuts
400g milk chocolate melts
3 - 4 tablespoons vegetable oil
50g icing sugar
2 tablespoons cocoa
1 teaspoon vanilla extract

  1. Preheat oven to 160°C and line a cookie sheet with baking paper
  2. Add hazelnuts to tray and bake for 10 minutes until skins have blistered.
  3. Place the hazelnuts in a tea towel and roll gently to remove the hazelnut skins. Allow to cool.
  4. Melt the chocolate in short intervals in the microwave, or over a double boiler, until completely melted and smooth.
  5. Place the cooled, skinned hazelnuts in to the bowl of a food processor and process until they form a paste.
  6. Add vegetable oil, icing sugar, cocoa and vanilla and pulse until thoroughly mixed.
  7. Add the melted chocolate and process until desired smoothness is achieved. Add more oil if necessary.
  8. Add hazelnut spread to jars and seal.

Food Gifts Secret Santa Cassie Cakes
Crunchy and delicious!
The American treat gets an Australian makeover with Macadamia brittle. Ludicrously simple and ridiculously delicious, add to ice cream for a taste sensation or enjoy on it's own!

Macadamia Brittle
Prep time: 10 mins
Cooking time: 20 mins
Total time:  30 mins

Servings: 2 large trays

500g raw whole macadamia nuts
500g caster sugar
125ml water
100g butter, chopped

  1. Preheat oven to 160°C and line 2 cookie sheets with baking paper 
  2. Add macadamia nuts to one tray and bake in the over until nuts are just turning golden.
  3. Allow nuts to cool and roughly chop. Divide the nuts between the two prepared trays and spread evenly.
  4. Place sugar and water in a large, heavy based pan and melt over a medium high heat until the sugar is dissolved.
  5. Cook the mix without stirring for 5 - 10 minutes until the sugar has turned golden.
  6. Turn off the heat and add butter, swirling pan to melt.
  7. Pour half the sugar mix over the macadamias on one tray then the other half over the nuts on the second tray.
  8. Allow to set, then break into portions.
Food Gifts Secret Santa Cassie Cakes
Merry Christmas!


Visit Four Weeks of Christmas Baking past!:2015
Week 1: Chocolate Dipped Vanilla Shortbread
Week 2: Bauble Macarons

2014
Week 1: Christmas Star Cherry Tart with Cinnamon Honey Roasted Macadamia Ice Cream
Week 2: Raspberry Jam Drops
Week 3: Rum Ball Trifle
Week 4: Eggnog Cake

Monday 14 December 2015

Bauble Macarons

The French biscuit gets a Christmas makeover. Glittery, delicate and festive, these baubles are almost too pretty to eat! Almost!
Bauble Macarons Cassie Cakes
How darling! Please note, I used glue to make this happen. Those fondant gold loops won't hold your macarons in the tree.
You know what my favourite time of the year is? If this is your first time to the blog, you may not guess that it's Christmas. You probably would guess though because this is quite obviously a Christmas post. What other time of year can you use glitter so liberally and unabashedly! None. No time. Christmas is all about glitter and sparkle and fairy lights and tinsel. Don't use tinsel though. Tinsel is passé.
Bauble Macarons Cassie Cakes
So few ingredients for so much MAGIC! Hey Santa. (salt and pepper shakers...)
Anyway. Glitter. Originally, I had planned on making candy cane macarons. And that would have been cool. Maybe next Christmas, they'll make an appearance. But when I did a quick google search, there were already so many! My candy cane macarons would get lost in the massive pile of already gorgeous cookie sandwiches. And to be honest, candy canes? Mint buttercream? How would that even work...
Bauble Macarons Cassie Cakes
The scales is your friend. This goes to..

Bauble Macarons Cassie Cakes
...these!
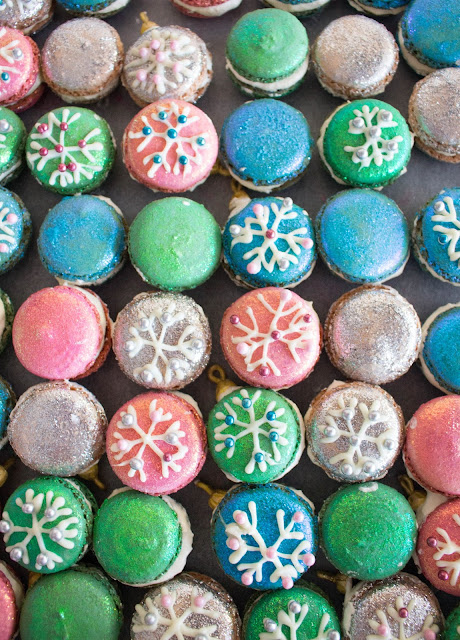
But my heart was set on macarons...how could I make them original? Given my predilection for all things loud and flashy, this was the natural choice. Bauble macarons! Covered in glitter with snowflakes, sugar pearls and gold bauble tops, these scream fun!

Bauble Macarons Cassie Cakes
Start these at least 24 hours before you need them. I could not be bothered making 48 of these. Power to you, if you do! I stopped at 20.
I used my macaron recipe from the Chocolate Cheesecake Macarons and I was a little nervous, as I have read that sometime the first time a person makes macarons, they can fluke it. Then the second time - fail. But nope! They turned out great! I followed the same tips as in the previous post. There are lots of details on the Chocolate Cheesecake Macaron post, but in brief the tips are...
Bauble Macarons Cassie Cakes
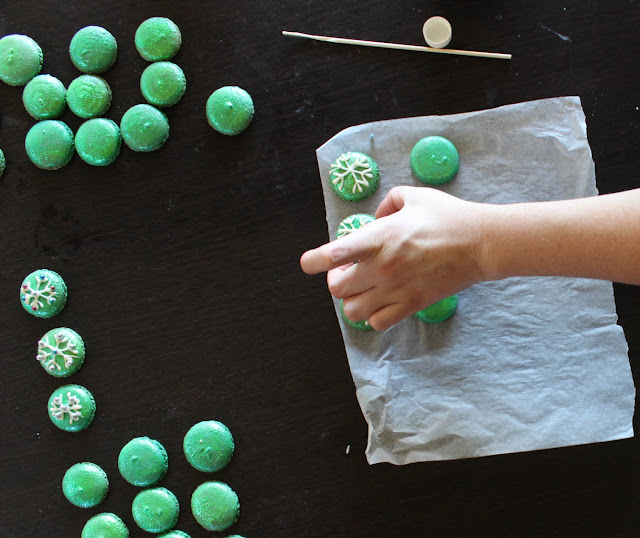
Make a little paste and paint the macarons to make them FABULOUS!
1. Room temp eggs
2. Sifted almond meal
3. Precisely mixed batter
4. Bang the tray with the piped macarons to get air bubbles out.
5. Let the piped macarons sit on the bench for 30 minutes to develop a "skin" and help create the "foot" of the macaron.
Bauble Macarons Cassie Cakes
 
Bauble Macarons Cassie Cakes
 
Bauble Macarons Cassie Cakes

So start with room temperature eggs. Bring cold eggs to room temp quickly by sitting them in warm water if need be. Once the egg whites are beaten and foamy, then it's time for the second tip...
Bauble Macarons Cassie Cakes
Thanks Mr Cakes for taking this photo! Legend.
Bauble Macarons Cassie Cakes

Sift the almond meal and icing sugar. Even if the almond meal is store bought, it can have larger bits of almond in it so sift to ensure a smooth cookie. Then add it to the egg whites and add colouring. Since I was making four different coloured macarons, I weighed the egg whites, and then weighed out the sifted icing sugar, to get four equal parts.
Bauble Macarons Cassie Cakes
Pretty.

Bauble Macarons Cassie Cakes
They make me think of Mardi Gras. Why is that? It's the Alyssa Edwards in me.
The ambiguous and crucial tip -  do not over mix or under mix the batter. Not the best for the most important step to be cryptic, but fold the batter deliberately and precisely. Assess the batter after each fold. The batter should be thick and flow like molten lava. I found that because some of the bowls of batter had to sit un-piped in bowls, it would need a few more folds before I piped it. So don't be too concerned if the batter thickens up while it's waiting.
Bauble Macarons Cassie Cakes
SO CUTE!
Once the batter is mixed, pipe out the shells on to the trays, using the template under baking paper then bang the trays firmly 3 or 4 times on the bench to bring the air bubbles to the surface then let the macarons sit to develop a skin, which helps give the biscuits a nice foot.
Bauble Macarons Cassie Cakes
How amazing is food glitter.
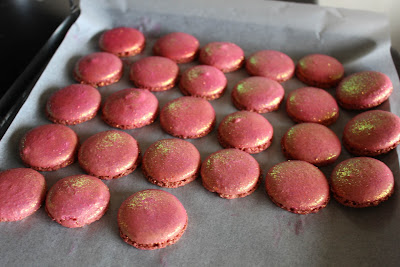
After all the trays are baked and the macarons have cooled, it's time to get glittering! Oh my goodness, it was so much fun to watch the macarons go from drab to fab! Using a bit of vodka, make a thick liquid with edible food glitter. Think nail polish thickness. Then get a painting!
Bauble Macarons Cassie Cakes
And they taste good too!

Don't worry about alcohol on the macarons, it will evaporate. Which could be a bad thing, depending on who you ask.


Bauble Macarons Cassie Cakes
Christmas achievement UNLOCKED!

Merry Christmas everyone! Two weeks to go!

Visit Four Weeks of Christmas Baking past!:
2015
Week 1 of Four Weeks of Christmas Baking: Chocolate Dipped Vanilla Shortbread

2014Week 1 of Four Weeks of Christmas Baking: Christmas Star Cherry Tart with Cinnamon Honey Roasted Macadamia Ice Cream
Week 2 of Four Weeks of Christmas Baking: Raspberry Jam Drops
Week 3 of Four Weeks of Christmas Baking: Rum Ball Trifle
Week 4 of Four Weeks of Christmas Baking: Eggnog Cake

Bauble Macarons
Use
this template  to ensure your macarons are even and consistently sized. Lie the template under baking paper and pipe the batter on. Make sure the template is removed before baking.

Prep time: 60 mins

Cooking time: 15 mins
Total time:  75 mins
 
Servings: 48 sandwiched macarons

Fondant Bauble Tops
White fondant - 30g will be plenty
Food colouring - yellow
Food lustre powder - gold

Macarons
6 large egg whites, free range, room temperature
Pinch of salt
1/2 teaspoon cream of tartar
100g caster sugar
400g icing sugar
2 cup/240g almond meal
Food colouring -  pink, blue, green

Edidble food glitter
Vodka

Vanilla Buttercream
250g butter, softewned
4 cups icing sugar, sifted
2 teaspoon vanilla extract

White food colouring
Bauble Tops - start at least 24 hours before use
  1. Colour white fondant yellow and take pea sized amount, form into a rounded pyramid shape.
  2. Flatten the top of the pyramid shape and create a hole on top with a skewer. Add details to the sides. Allow to dry slightly.
  3. Roll a small amount of fondant into a long, thin cylindrical shape, then create a loop.
  4. Use a small amount of water to affix the loop in the hole of the pyramid shape and allow to dry overnight.
  5. Brush with gold dust, if desired.
Macarons
  1. Preheat oven to 150°C
  2. Using a template to ensure the macarons are evenly sized, line a two trays with baking paper.
  3. Beat egg whites in the bowl of a mixer until egg whites are foamy.
  4. Add pinch of salt and cream of tartar and continue to beat egg whites,
  5. Slowly sprinkle in caster sugar and continue beating for around 8 minutes, until egg whites are stiff, peaks hold and do not collapse.
  6. Separate egg whites in to quarters, using scales to ensure each is the same size.
  7. Add food colouring to each of the four bowls - pink, blue, green and leave one bowl uncoloured.
  8. Sift almond meal and icing sugar in to a large bowl, then seprate in to quarters using scales. 
  9. Gently add one bowl of sifted almond meal and icing sugar into one bowl of egg white mix.
  10. With a flat spatula, gently and precisely fold the almond meal . Batter should be thick and flow off the spatula - think 'molten lava'.
  11. Repeat with each egg white mix.
  12. Pipe macarons using a large piping bag and open round tip.
  13. Allow piped macarons to sit uncovered on the bench for 30 minutes. A skin will form that feels tacky to the touch and does not leave a fingerprint.
  14. Bake for 15 minutes. Bake one tray at a time, on the same shelf to ensure they are baked evenly.
  15. Remove from oven and allow to cool completely.
  16. Add edible food glitter to small bowl, then add vodka using a teaspoon or dropper to add very small amounts at a time. Create a thick liquid and paint on to macaron tops. Allow to dry.
  17. Melt small amount of white chocolate and pipe snowflake pattern on to desired number of macarons and decorate with sugar pearls. Allow to dry.
  18. Use a small amount of buttercream to attach bauble tops.
Vanilla Buttercream
  1. In the bowl of a mixer, beat butter and icing sugar until creamy.
  2. Add vanilla and white food colouring and beat until combined and mix is smooth and creamy.
To assemble
  1. Match each macaron half with another of the same size.
  2. Using a round tip fitted on a piping bag, pipe a generous circle of buttercream on one biscuit then sandwich corresponding biscuit, pushing buttercream to edges.
  3. Store in an airtight container.


Thursday 10 December 2015

REVIEW: Papparich

Cassie Cakes Review Papparich
Papparich in the Wintrergarden
Food is a massive part of culture, and one of the most enjoyable parts. It's one of the most accessible ways to learn about a country, what the people eat is influenced by trade, by the environment, by climate and so much more. Cuisine evolves, new produce effects trends, new technology's change how meals are prepared and the movement of people regenerates food. Take how the Greek immigrants brought Greek food and café culture to Australia in the 1950's and 60's, or how the classic fish and chips was introduced to England in the 16th century from Jewish refugees. Food is history, food is life and inextricably bound together with culture.
Cassie Cakes Review Papparich

Malaysia is a melting pot and the food reflects this. With restaurants in all over Australia and overseas, Papparich comes to Brisbane, opening a brand new franchise in the Wintergarden. The restaurant has an open kitchen, giving a great view of the flaming woks. We were seated in the open-air balcony area and while it was pretty, I can't deny it was very warm. But this did steer us towards the extensive beverage menu and its enticing range of icy drinks.
Cassie Cakes Review Papparich
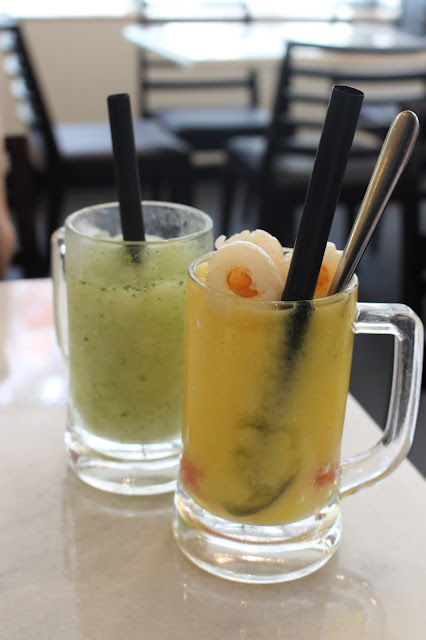
Icy goodness
We ordered Mango Mania and Tropical Lime  ice blended drinks. Both were cooling and refreshing, but definitely for those with a sweet tooth. We got straight on to entrees and although I was absolutely DEVASTATED that there were no Pappa Deep Fried Chicken Skins left, we consoled ourselves with the Pappa Fried Chicken Wings. They were moist on the inside and crispy on the outside. If the chicken skins are half as good as the wings, I will be returning for them soon!
Cassie Cakes Review Papparich
Yummy goodness!
We got two mains and shared them and we absolutely agonized over our choices. Malaysia has such a broad range of dishes, with Indian, Chinese, Malay and Indonesian influences. We settled on Vegetarian Char Koay Teow with egg and the exciting looking Roti Telur with Beef Rendang.
Cassie Cakes Review Papparich

The Char Koay Teow took me straight back to hawker markets and hot South-East Asian nights, with delicious silky rice noodles and the charred, fiery taste of the wok. This dish is a Malaysian classic with great flavours and the contrast between the exquisitely slippery noodles and crispy vegetables. A definite winner dish.
Cassie Cakes Review Papparich
Such an exciting dish!
The Roti Telur with Beef Rendang came out on a big silver tray with the roti in the centre and curry and condiments on the outside. The pieces of beef were tender and fell apart. The curry was fairly mild with a sweet taste that paired well with the roti. It was fun to adjust taste with the condiments on the side.
Cassie Cakes Review Papparich
Interesting...

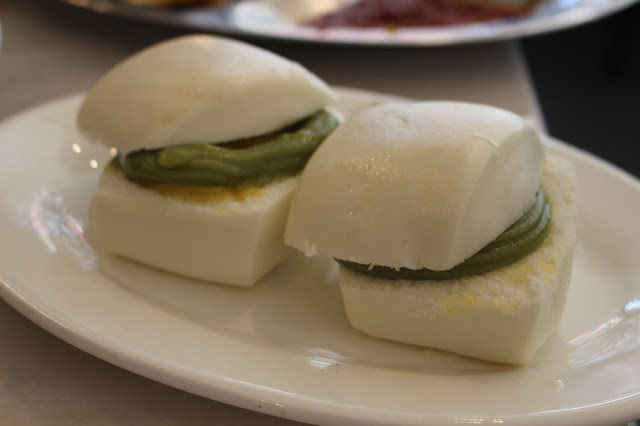
Finally, we decided to get a little adventurous and ordered one of the most unusual items we could find. We decided upon the Steamed Mantau with Kaya, steamed buns with a sweet green paste which was coconut jam. The buns had a generous smear of butter on them too. Now, I have to be honest, I did not like these at all. But my dining companion, while she agreed that they were unusual, ate most of her bun. And I'm glad I tried them.

Papparich offers a wide range of dishes with curries, noodles, soups and fried goodies, it's the perfect place for a weekday lunch or languorous dinner. Affordable and efficient, it's a welcome addition to the city's dining landscape.

Disclaimer: Cassie Cakes was an invited guest of Papparich Brisbane. Opinions are my own and the above review is an honest account of my experience.

  PappaRich Menu, Reviews, Photos, Location and Info - Zomato

Sunday 6 December 2015

Chocolate Dipped Vanilla Shortbread

A delicious buttery vanilla biscuit , generously dipped in milk and white chocolate. Perfect to give as a homemade gift!
 
Cassie Cakes Chocolate Dipped Vanilla Shortbread

Oh my stars, look at this! The first week of the second year of Four Weeks of Christmas baking! Mull that over for a minute and figure out the time line then join me in a big fat YAY! My tree is up and shining beside me as I type and I have a Christmas candle burning, I really love this time of year.
Cassie Cakes Chocolate Dipped Vanilla Shortbread
In December, we use salt and pepper from a Santa and Sack combo. That's how we roll.

 Is any other biscuit so quintessential Christmas as shortbread? How did that happen? Shortbread is Scottish, I know that much. But why is it associated with Christmas? I did a quick google and couldn't find an answer on the first two pages I clicked on so I'm stumped. If you know, please leave a comment and tell me!
Cassie Cakes Chocolate Dipped Vanilla Shortbread
Little offset spatula. How handy you are.

Mr Cakes loves shortbread. Or he did. When I asked him the morning of baking the shortbread, he didn't seem too excited. He had just come off night shift so that might explain it, though anything Christmas related should be welcomed with a ridiculous amount of enthusiasm. That's how I live my life.
Cassie Cakes Chocolate Dipped Vanilla Shortbread
Little stars and maybe the circles are moons! A Christmas sky.

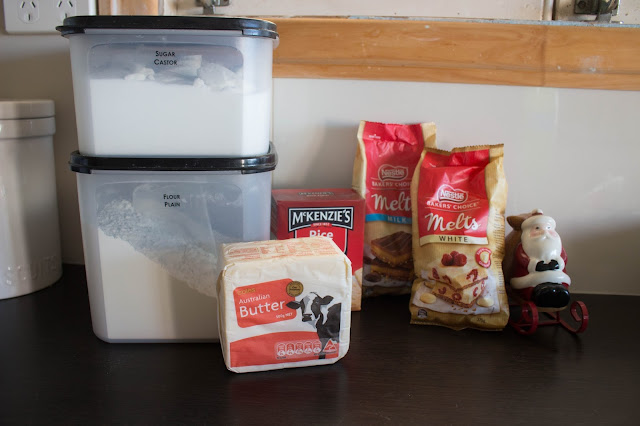
Shortbread gets its name from the 'shortness' of the dough, meaning it's buttery and has a high proportion of fat. The recipe traditionally is very simple with just butter, plain flour, rice flour and sugar as well as a dash of salt. There are many variations and commonly, the rice flour is substituted with cornflour. Cornflour will make a softer biscuit and rice flour gives a crisper, more crumbly biscuit. Ever the traditionalist - with baking at least - I use rice flour.
Cassie Cakes Chocolate Dipped Vanilla Shortbread
That pink dish cost me $20, it was more than 60% off. That is a Christmas miracle. But I had to bring it up the back stairs so Mr Cakes didn't see it as I have been spending waaaay too much money. How did it get here, he'll ask and I'll say "SANTA!"

I did stray ever so slightly by adding a vanilla pod to the dough. I wanted not only the amazing flavour of vanilla but I find those tiny black dots so pretty on the surface. Like their own teeny tiny baubles. Then I went further off the traditionalist path by dipping them in chocolate. And I don't think I need to explain that chocolate makes everything better. We all know that. That's science.
 
Cassie Cakes Chocolate Dipped Vanilla Shortbread
Bon-bons were half price too. And the pack said they're luxury bon bons. Bargain.

This is such a simple recipe, a really great one to do with little ones in the kitchen. I don't have any little ones (yesssssssss) but I do have puppies and they like to help too. Snuffling up any dropped bits of dough so quick. So helpful.
Cassie Cakes Chocolate Dipped Vanilla Shortbread
Pretty. God, I'm glad I bought that dish. I got one in mint too, which will definitely be making an appearance soon.

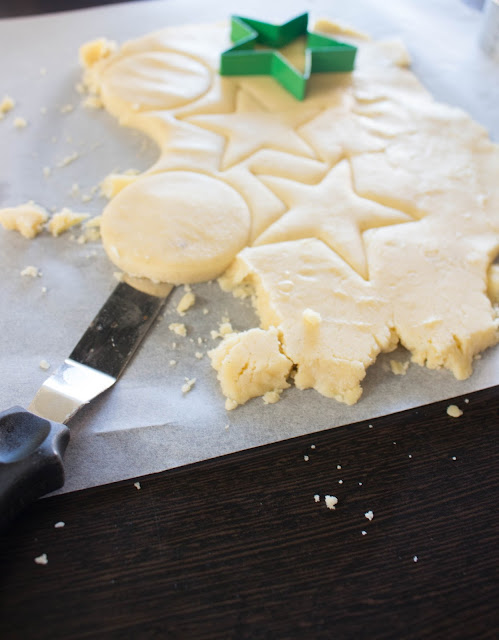
 Once the dough has been made, I like to roll the dough out on a piece of baking paper. This ensures less mess but also makes it easier to get the cut out cookies off the bench. When making stars, this is especially important as a little stickiness on the points of the stars came make them misshapen.


Cassie Cakes Chocolate Dipped Vanilla Shortbread
This shortbread is really yummy, the vanilla makes it pop. And the chocolate. Chocolate makes everything better.
These would make great gifts, they would look so pretty wrapped in a bit of cellophane and tied with a little red bow. Also, they're pretty inexpensive which counts around this time of year, so many expenses.

Cassie Cakes Chocolate Dipped Vanilla Shortbread
Remember to leave some cookies out for Santa!
I just ate a burrito and then had two of these delicious shortbreads and I tell you, I could get a second job as a shopping centre Santa. God, I'm so full.

Visit Four Weeks of Christmas Baking past!:

Week 1 of Four Weeks of Christmas Baking: Christmas Star Cherry Tart with Cinnamon Honey Roasted Macadamia Ice Cream
Week 2 of Four Weeks of Christmas Baking: Raspberry Jam Drops
Week 3 of Four Weeks of Christmas Baking: Rum Ball Trifle
Week 4 of Four Weeks of Christmas Baking: Eggnog Cake

Chocolate Dipped Vanilla Shortbread
Adapted from The Guardian shortbread recipe

Prep time: 10 mins

Cooking time: 27 mins
Total time:  37 mins

Servings: 24 cut-out biscuits

230g butter, softened
120g caster sugar
1 vanilla pod, scraped
260g plain flour
80g rice flour
150g milk chocolate
150g white chocolate
 
  1. Preheat oven to 150°C and line two cookie sheets with baking paper
  2. In a large bowl, beat the butter with a wooden spoon until soft then add the sugar and mix thoroughly.
  3. Scrape in the seeds from a vanilla pod and mix.
  4. Sift in both flours and mix to a smooth dough.
  5. Roll out dough to 1cm thickness and cut using assorted shaped cutters.
  6. Place on the prepared cookie sheets, at least 2cm apart and place in the fridge to chill for at 15 minutes.
  7. Bake each tray on the middle shelf of the oven for 27 minutes, or until cookies are just cooked.
  8. Allow to cool.
  9. Melt the chocolates in separate bowls, in the microwave in 30 second intervals.
  10. Dip each cookie in the melted chocolate and allow to dry.
  11. Enjoy!

Powered by Blogger
Design byJasmineJoy